This is the third installment in a series regarding the construction and outfitting of a wilderness camp from the book “Woodcraft” by E.H. Kreps, 1919. This segment talks about the construction of the gables and roof.
If you missed the previous segments you can click on the links below.
1st Installment: Selecting a location and initial preparation of a wilderness camp
2nd Installment: Construction of walls, floor, door and windows for a cabin
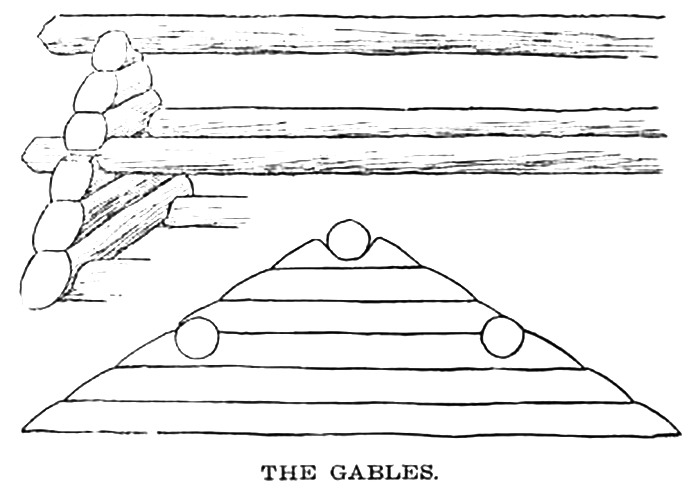
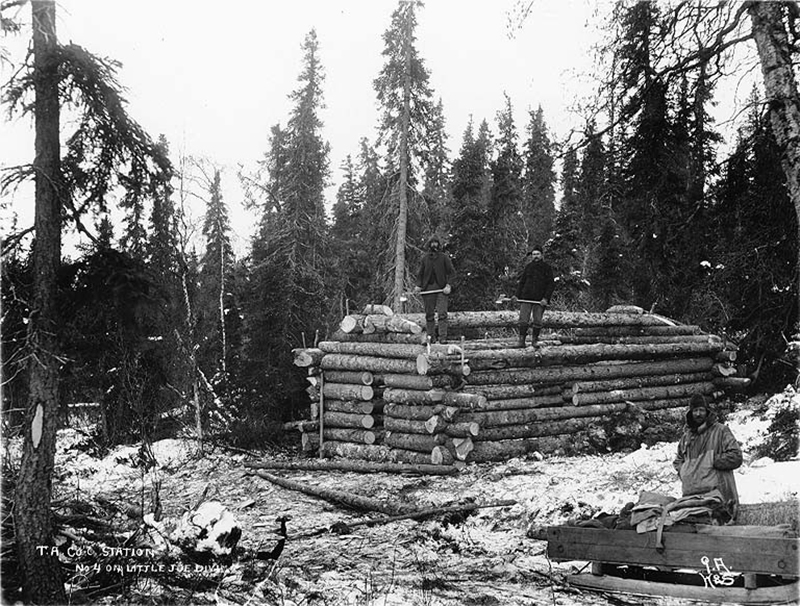
When the walls have been raised to a height of about six and a half feet above the floor sills we commence work on the gables. These are constructed by placing a full length log across the end, a shorter one on top of this, continuing thus until high enough. This is best done by setting a pole up in the end of the camp exactly in the middle of the end wall, the top being just the height of the proposed gable. From the top of this straight pole, poles are run down to each corner and these give the slope of the gables, also of the roof. The logs are then cut off on an incline at the ends to conform with the line of this pole, and are fastened one on top of another by boring holes and driving wooden pins into them. When both gables have been raised to half their height we cut two 17-foot binding poles, each six inches thick in the middle, and notch them into the logs of the gables. These logs or poles not only give more stability to the gables, but they also make a support for the roof, and are a nice foundation for a loft on which to store articles after the camp is finished. When the ends are brought up to within about eight inches of the required height a stout, straight ridge pole of the same length as the binding poles is placed on top, and notched lightly into the top log.

Our camp is now ready for the roof, and what are we to use for this most important part. I have no doubt that camp roofs have caused more gray hairs for woodsmen than any of the other problems they have to solve. If it were early summer when the bark could be peeled from cedar and spruce trees we would have no trouble, but bark is not available now. About the only style of roof that we can make now is what is called a scoop roof, made from split logs. We must find a straight-grained, free-splitting wood for this, and of the woods at hand we find balsam the best, so we cut balsam trees about eight or ten inches in diameter, and make logs from the butt of each, about seven feet long, so that they will reach from the top of the ridge-pole to the walls and extend a foot beyond. These we split through the centre and hollow out each in a trough form, by cutting notches in the flat side, without cutting the edges, and splitting out the sections between. We place a layer of these the entire length of the roof, hollow side up, and notch each in place so that it cannot slip or rock. Between each set of these troughs we will place a three-inch pole, and on top of the pole we place marsh moss. Then we place over these poles a second layer of the troughs, hollow side down, and over the ridge pole we place a large, full-length trough. This latter we must make by hewing a log flat on one side and then hollowing it out, for we cannot find a tree with such a straight grain that we can split a 17-foot length without more or less of a twist.
Before completing our roof, in fact when the first layer of scoops are placed on, we must make provision for our stove pipe, for it must have an outlet through the roof, and the location the stove is to have in the cabin must be determined. A hole 12 or 14 inches square is left in the roof, by using a few short scoops, and this hole is covered with the sheet of tin we brought for the purpose, and a slightly oblong hole is cut in this for the stove pipe. The edge of this hole we turn up with the hammer, which makes it waterproof, and when finished it is such a size that the pipe makes a snug fit. The whole thing is so arranged that water cannot run under from the top, but this is difficult to explain.
A roof like this causes a lot of work, in fact as much as the remainder of the camp in some cases, but if carefully made it is a good roof, warm and waterproof. It must be well mossed or snow will sift in, and the lower ends of the troughs, from where they cross the walls, should be cut deeper than the portion above. If this is not done the ice which forms in the ends of these troughs will back the water up until it runs over the edges and down the walls of the cabin. It may even be necessary occasionally during the winter to clean the snow off the lower edge of the roof and clip the ice from the troughs with a hatchet. The steeper the roof the less trouble there will be from this source.
In the next installment we’ll go over finishing doors and windows and closing cracks.