We’ve finished the part of this series constituting the construction and outfitting of a wilderness camp from the book “Woodcraft” by E.H. Kreps, 1919. This part of the series goes into furnishing your wilderness cabin as described in this same book and starts off with the construction of a stove. In case you missed the initial series, follow the links below.
1st Installment: Selecting a location and initial preparation of a wilderness camp
2nd Installment: Construction of walls, floor, door and windows for a wilderness cabin
3rd Installment: Construction of gables and roof for a wilderness cabin
4th Installment: Finishing the wilderness cabin door, window and filling cracks
The Stove
From the book “Woodcraft” by E.H. Kreps, 1919
A single day’s work will do wonders towards making a cabin comfortable. Sometimes through press of more important work, such as getting out a line of traps while the season is yet young, the trapper may well neglect these touches of comfort, and the simplest of camp furnishings will answer until a stormy day keeps him indoors, when he can make good use of his time in making camp furniture. A bed and a stove or fireplace are the only absolutely necessary furnishings to start with, if other work demands immediate attention.
But in our own case such neglect is not at all necessary. The preceding chapter saw our cabin completed, that is the walls, roof and floor, all that can really be called cabin, but much more work will be required before it is really comfortable and ready for occupancy. Providing the camp with suitable furniture and adding conveniences and comfort is the next step, so while we have time and there is nothing to hinder the work we will push it along.
Most important of all camp furnishings is the stove. Nothing else adds so much to the cheerfulness and home-like aspect of a camp as a properly enclosed, well behaved fire, which warms up the room, enables us to cook our food indoors, and dispenses the gloom of night by driving the darkness into the farthest corners. If the weather is cold nothing in the camp is so indispensable.

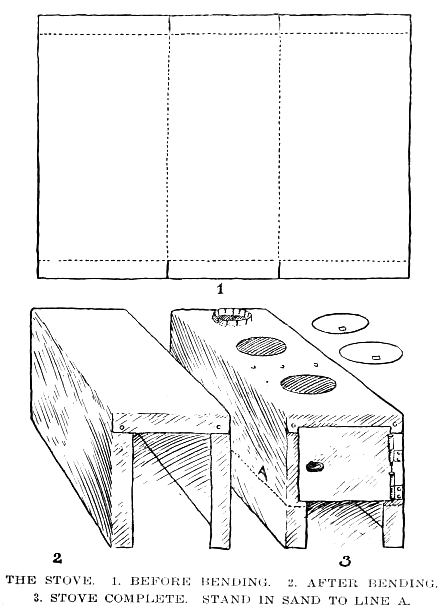
For the lodge which we built in the preceding chapter we will make a stove of sheet iron. I have made a number of camp stoves by riveting together four sections of new, unbent stovepipe into a square sheet, bending this into proper shape, fitting ends, and cutting holes for cooking utensils and for the pipe. But for this camp we have secured from a hardware store a pipe of sheet iron three feet wide by four feet long. We now place this on the floor of the cabin and measure off from each end 17 inches, then on each edge at the 17-inch mark we make a three-inch cut. This we do by holding the sheet metal on a block or flat topped stump, placing the corner of the axe on the metal at the proper place, and striking on the head with a billet of wood. Then we place a straight edged strip of wood across the end on the 17-inch mark, and standing on this wood we pull the end of the metal upward, bending it to a right angle. The other end is treated the same way and this leaves the metal in the form of a box, three feet long, 17 inches high, and 14 inches wide, open on top and at both ends. Now we turn this upside down and in the top we cut two seven-inch holes, as round as we can make them. These are to hold the cooking utensils. Near one end we cut a small hole, not more than three and a half inches in diameter. The edge of this hole we cut at intervals all the way around, making straight, one-half inch cuts. Then we turn these edges up, and we have a stovepipe hole, with a collar to hold the pipe in place. We now close the rear end of the stove by bending three inches of the sides into a right angle, the same amount of the top being bent down. This is the purpose of the three-inch cuts we made when we first commenced the work. Now we rivet a piece of sheet-iron into this end, using for rivets the head ends of wire nails. They must be cut short and riveted on the head of an axe. Beneath the top of the stove, between the cooking holes we rivet a folded strip of metal; this is to stiffen the top. Then we turn in three inches of the front of the stove and rivet the corners where they lap. This leaves an eight-inch opening in front over which we will hinge a door. This door must have some kind of fastening, and a simple little twist of wire working in a punch hole is easily arranged and convenient. We can make a very crude stove of this if we like, but we do not want that kind, so we take plenty of time and turn out a satisfactory article.
Our stove is now completed except for the covers which are easily made. We set it up in the box-shaped opening left in the floor and fill around it with sand to a height of six inches, also fill the inside to that height. While doing this we must see that the stove stands perfectly level, and that the pipe hole is directly beneath the hole in the roof. This makes a fireproof stove and the bed of sand holds it rigidly in place. A draft is made beneath the door by scraping away a little sand. The pipe is five-inch size and we fit it with a damper for that is the way to regulate the draft and keep the heat from going up the pipe.
In the next installment, we’ll furnish our wilderness cabin with a bed
Last year I saw a very clever video in which some guy dug a trench the length of his hut and covered it with fire-hardened clay, then built a fire pit at one end and a chimney at the other. It seemed like a hot idea for low-tech central heating, if you could keep the smoke under the floor.